My brother Sebastian has always been the chef in the house. When my mum got sick, I was very young and she lost of her touch with cooking (to put it nicely), so from a young age my brother took over.
Although it is an unconventional situation, my family continually get restaurant quality meals thanks to him.
About three years ago Sebastians body changed and he couldn't eat pastries or a lot of other things. Food gave his body hell for a long time so before he cut out pastry altogether, I made him teach me how to make something we simply call 'triangles'.
Now, like a mother down to daughter process, I'm going to teach all of you.
What you will need:

One packet of puff pastry - even the cheap stuff works fine.
Approx 200g of salami.
Approx 250g of ricotta cheese.
A jar of your favourite pasta sauce - try to keep it simple like a classic tomato or nepolitana.
A tub or squeeze bottle of tomato paste.
A pack of tasty cheese.
A knife, a spoon and a fork.
Mushrooms and onions are optional.
Step One:
Preheat your oven to 180 degrees.
After defrosting two or three sheets of puff pastry (not to the point they are droopy, but so you can move it and it wont snap).

Step Two:
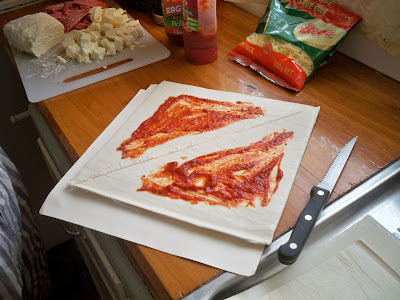
Place one sheet of puff pastry on a clean bench with the plastic underneath still on. Cut a line from the top left corner to the bottom right corner, making the sheet into two triangles.

Step Three:
Get a big tablespoon with of tomato paste and place it right in the middle of each of the triangles. Take the back of your tablespoon or a knife and spread it out so that there is an inch of the pastry around the edge that is not covered. This is VERY important. The paste doesnt have to be perfect, it is just a base.
Step Four:
Spoon 2 - 3 tablespoons of your pasta sauce ontop of the paste, still leaving an inch around the edge bare.

Step Five:
Cut your ricotto cheese into cubes. They don't have to be even. Mine are usually big because I love ricotta but it's upto you. Grab your sliced salami, keep three or four pieces of salami together and cut them into strips roughly 1cm wide. Take your cubes of ricotta and place roughly 6 ontop of the pasta sauce, cover end to end.Place the salami over the ricotta, still keeping the 3 pieces together. (Here is where you'd add your sliced mushrooms and onion.)


Step Six:
Sprinkle your tasty cheese ontop generously.

Step Seven:
With clean hands, dip two of your fingers into a glass of water and run them along the bare edge of the pastry. Lift one of the corners of the pastry and fold it over so that you are folding your triangle in half. Now with your fork or your fingers, stamp TWO of the three edges together so that they seal closed.

Step Eight:
Lift up the triangle so the open edge is facing upwards. Spoon three or four more tablespoons of pasta sauce evenly ontop from edge to edge. Sprinkle extra tastey cheese on top of that.

Step Nine:
Carefully lay the triangle back down, use your hands and push any ingredients that have fallen forward, back into the triangle and then fork stamp it closed. Use your fork and poke two or three sets of holes in the top of the triangle so the ingredients can breathe in the oven.


Step Ten:
Repeat these steps with the second triangle and place them on the tray. Place the tray on a middle shelf in the oven and leave for roughly 10 - 15 minutes or until a light golden brown. When top of the triangle is starting to LIGHTLY brown in the oven, drag tray out of the oven so you don't burn your hands and carefully flip them over. If there is some spillage of the pasta sauce, it doesn't matter because there is still plenty of filling but I wipe the tray roughly with a teatowel so the spilled sauce doesn't dry up and burn while.


Step Eleven:
Let the bottom side of the triangle (which is now facing up) go golden brown and then remove from the oven. Let the triangles sit for a minute or two and then plate them up.
The filling is too hot to eat straight away.
 For Best Results:
Line the oven tray with a sheet of baking paper.
Make all the triangles at once rather than completing one and moving on the the next.
Always make sure the edges are tightly sealed together. Smooth over any cracks in the pastry.
Notes:
You can make these as an entree or party size by simple cutting the pastry smaller.
These can be served alone, with no sides as they are a great meal.
They are fantastic the next day too. Just leave them on the stove top with a tea towel on top overnight or in the microwave on a plate and heat them the next day for lunch.
Triangles are not pretty and I could make them nice and presentable for the photos but it's just not me. They are a sloppy mess and I believe it makes them taste better if you do them roughly.
Bon Appetit!

One packet of puff pastry - even the cheap stuff works fine.
Approx 200g of salami.
Approx 250g of ricotta cheese.
A jar of your favourite pasta sauce - try to keep it simple like a classic tomato or nepolitana.
A tub or squeeze bottle of tomato paste.
A pack of tasty cheese.
A knife, a spoon and a fork.
Mushrooms and onions are optional.
Step One:
Preheat your oven to 180 degrees.
After defrosting two or three sheets of puff pastry (not to the point they are droopy, but so you can move it and it wont snap).

Step Two:
Place one sheet of puff pastry on a clean bench with the plastic underneath still on. Cut a line from the top left corner to the bottom right corner, making the sheet into two triangles.

Step Three:
Get a big tablespoon with of tomato paste and place it right in the middle of each of the triangles. Take the back of your tablespoon or a knife and spread it out so that there is an inch of the pastry around the edge that is not covered. This is VERY important. The paste doesnt have to be perfect, it is just a base.

Step Four:
Spoon 2 - 3 tablespoons of your pasta sauce ontop of the paste, still leaving an inch around the edge bare.

Step Five:
Cut your ricotto cheese into cubes. They don't have to be even. Mine are usually big because I love ricotta but it's upto you. Grab your sliced salami, keep three or four pieces of salami together and cut them into strips roughly 1cm wide. Take your cubes of ricotta and place roughly 6 ontop of the pasta sauce, cover end to end.Place the salami over the ricotta, still keeping the 3 pieces together. (Here is where you'd add your sliced mushrooms and onion.)


Step Six:
Sprinkle your tasty cheese ontop generously.

Step Seven:
With clean hands, dip two of your fingers into a glass of water and run them along the bare edge of the pastry. Lift one of the corners of the pastry and fold it over so that you are folding your triangle in half. Now with your fork or your fingers, stamp TWO of the three edges together so that they seal closed.

Step Eight:
Lift up the triangle so the open edge is facing upwards. Spoon three or four more tablespoons of pasta sauce evenly ontop from edge to edge. Sprinkle extra tastey cheese on top of that.

Step Nine:
Carefully lay the triangle back down, use your hands and push any ingredients that have fallen forward, back into the triangle and then fork stamp it closed. Use your fork and poke two or three sets of holes in the top of the triangle so the ingredients can breathe in the oven.


Step Ten:
Repeat these steps with the second triangle and place them on the tray. Place the tray on a middle shelf in the oven and leave for roughly 10 - 15 minutes or until a light golden brown. When top of the triangle is starting to LIGHTLY brown in the oven, drag tray out of the oven so you don't burn your hands and carefully flip them over. If there is some spillage of the pasta sauce, it doesn't matter because there is still plenty of filling but I wipe the tray roughly with a teatowel so the spilled sauce doesn't dry up and burn while.


Step Eleven:
Let the bottom side of the triangle (which is now facing up) go golden brown and then remove from the oven. Let the triangles sit for a minute or two and then plate them up.
The filling is too hot to eat straight away.
 For Best Results:
Line the oven tray with a sheet of baking paper.
Make all the triangles at once rather than completing one and moving on the the next.
Always make sure the edges are tightly sealed together. Smooth over any cracks in the pastry.
Notes:
You can make these as an entree or party size by simple cutting the pastry smaller.
These can be served alone, with no sides as they are a great meal.
They are fantastic the next day too. Just leave them on the stove top with a tea towel on top overnight or in the microwave on a plate and heat them the next day for lunch.
Triangles are not pretty and I could make them nice and presentable for the photos but it's just not me. They are a sloppy mess and I believe it makes them taste better if you do them roughly.
Bon Appetit!
3 comments:
That looks delicious <3 I'm a sucker for anything pizza-like~~ thanks for this awesome tutorial!!
Steph
I'll have to try this.
Yummy!!!I'll do this for dinner today! :D
Thanks doll!
And doll's brother for teaching her this!
Post a Comment